
Page 169 - Demo
P. 169
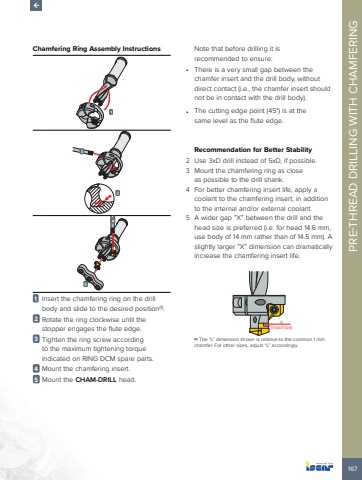
167PRE-THREAD DRILLING WITH CHAMFERING Chamfering Ring Assembly Instructions1 Insert the chamfering ring on the drill body and slide to the desired position(1).2 Rotate the ring clockwise until the stopper engages the flute edge.3 Tighten the ring screw according to the maximum tightening torque indicated on RING DCM spare parts.4 Mount the chamfering insert.5 Mount the CHAM-DRILL head.Note that before drilling it is recommended to ensure:%u2022 There is a very small gap between the chamfer insert and the drill body, without direct contact (i.e., the chamfer insert should not be in contact with the drill body).%u2022 The cutting edge point (45%u00b0) is at the same level as the flute edge.Recommendation for Better Stability2 Use 3xD drill instead of 5xD, if possible.3 Mount the chamfering ring as close as possible to the drill shank.4 For better chamfering insert life, apply a coolant to the chamfering insert, in addition to the internal and/or external coolant.5 A wider gap %u201cX%u201d between the drill and the head size is preferred (i.e. for head 14.6 mm, use body of 14 mm rather than of 14.5 mm). A slightly larger %u201cX%u201d dimension can dramatically increase the chamfering insert life.X(maximize)(1) The %u201cL%u201d dimension shown is relative to the common 1 mm chamfer. For other sizes, adjust %u201cL%u201d accordingly.
